
If you've noticed that beautiful silver and turquoise cuff you love is starting to look a little dull, don't worry—it's just tarnish. This natural chemical reaction happens to all sterling silver, especially in the humid, salty air of an estuarian landscape that many of us know well. This guide is made specifically for lovers of handcrafted Southwestern jewelry, so we'll skip the harsh, generic advice that could ruin your treasured pieces.
Instead, we're going to focus on methods that honor the unique nature of your collection. You'll discover simple, safe ways to restore brilliant shine without harming delicate stones like turquoise or compromising the intentional, oxidized details that give your jewelry its authentic, cowgirl soul.
Choosing the Right Tarnish Removal Method
Before you start cleaning, the most important thing is to identify what kind of jewelry you're working with. A solid silver band requires a completely different approach than a delicate ring with an intricate turquoise inlay. This decision tree is a quick way to figure out the safest path for your specific piece.
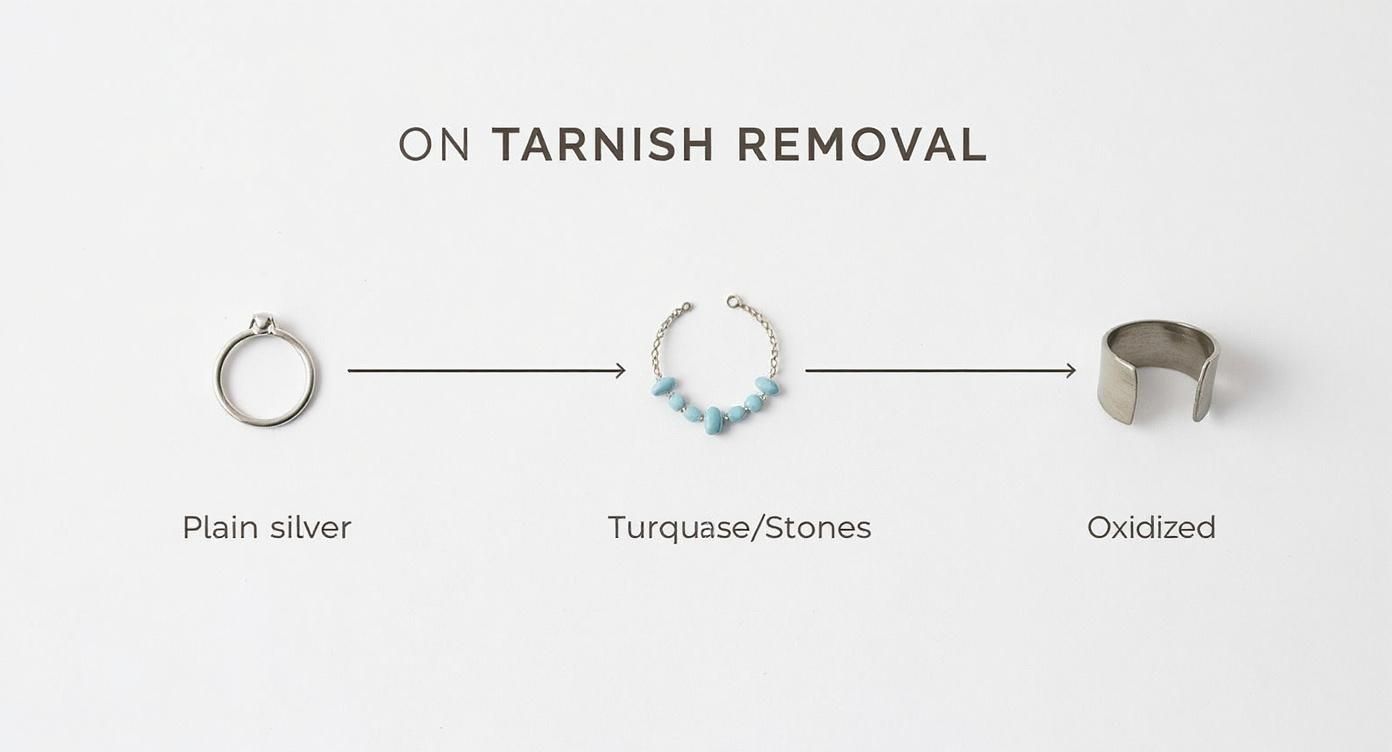
As the visual guide shows, plain silver offers a lot more cleaning flexibility. But once you introduce stones or intentional patinas—hallmarks of true Southwestern style—you need a much more targeted and gentle technique.
The goal isn't just to make it shiny; it's to preserve the artist's original vision. Over-cleaning or using the wrong method on an "antiqued" piece can strip away the dark accents that make the design pop, permanently altering its rugged character.
At-a-Glance Tarnish Removal Methods
To make it even simpler, here’s a quick-reference table. Choose the best cleaning method based on your jewelry type. This table summarizes the safest options for everything from a simple sterling silver chain to a prized piece of turquoise art.
| Jewelry Type | Best Method | Use When... |
|---|---|---|
| Plain Sterling Silver | Silver Polishing Cloth or Gentle Dip | Light to moderate tarnish; no stones or porous materials. |
| Silver with Turquoise/Gems | Silver Polishing Cloth (carefully) | You need to clean silver around the stone without touching it. |
| Oxidized or "Antiqued" Silver | Mild Soap and Water | You want to clean the piece without removing the intentional dark details. |
| Silver-Plated Jewelry | Mild Soap and Water | You want to avoid rubbing off the thin layer of silver plating. |
| Mixed-Metal Jewelry | Mild Soap and Water | You have different metals that may react to harsh cleaners. |
Remember, when in doubt, always start with the gentlest method first.
Whether you're refreshing a simple chain or a prized possession from our Western Boho Turquoise Collection, understanding these distinctions is the key to keeping your jewelry beautiful for years to come.
Understanding Why Your Silver Jewelry Tarnishes
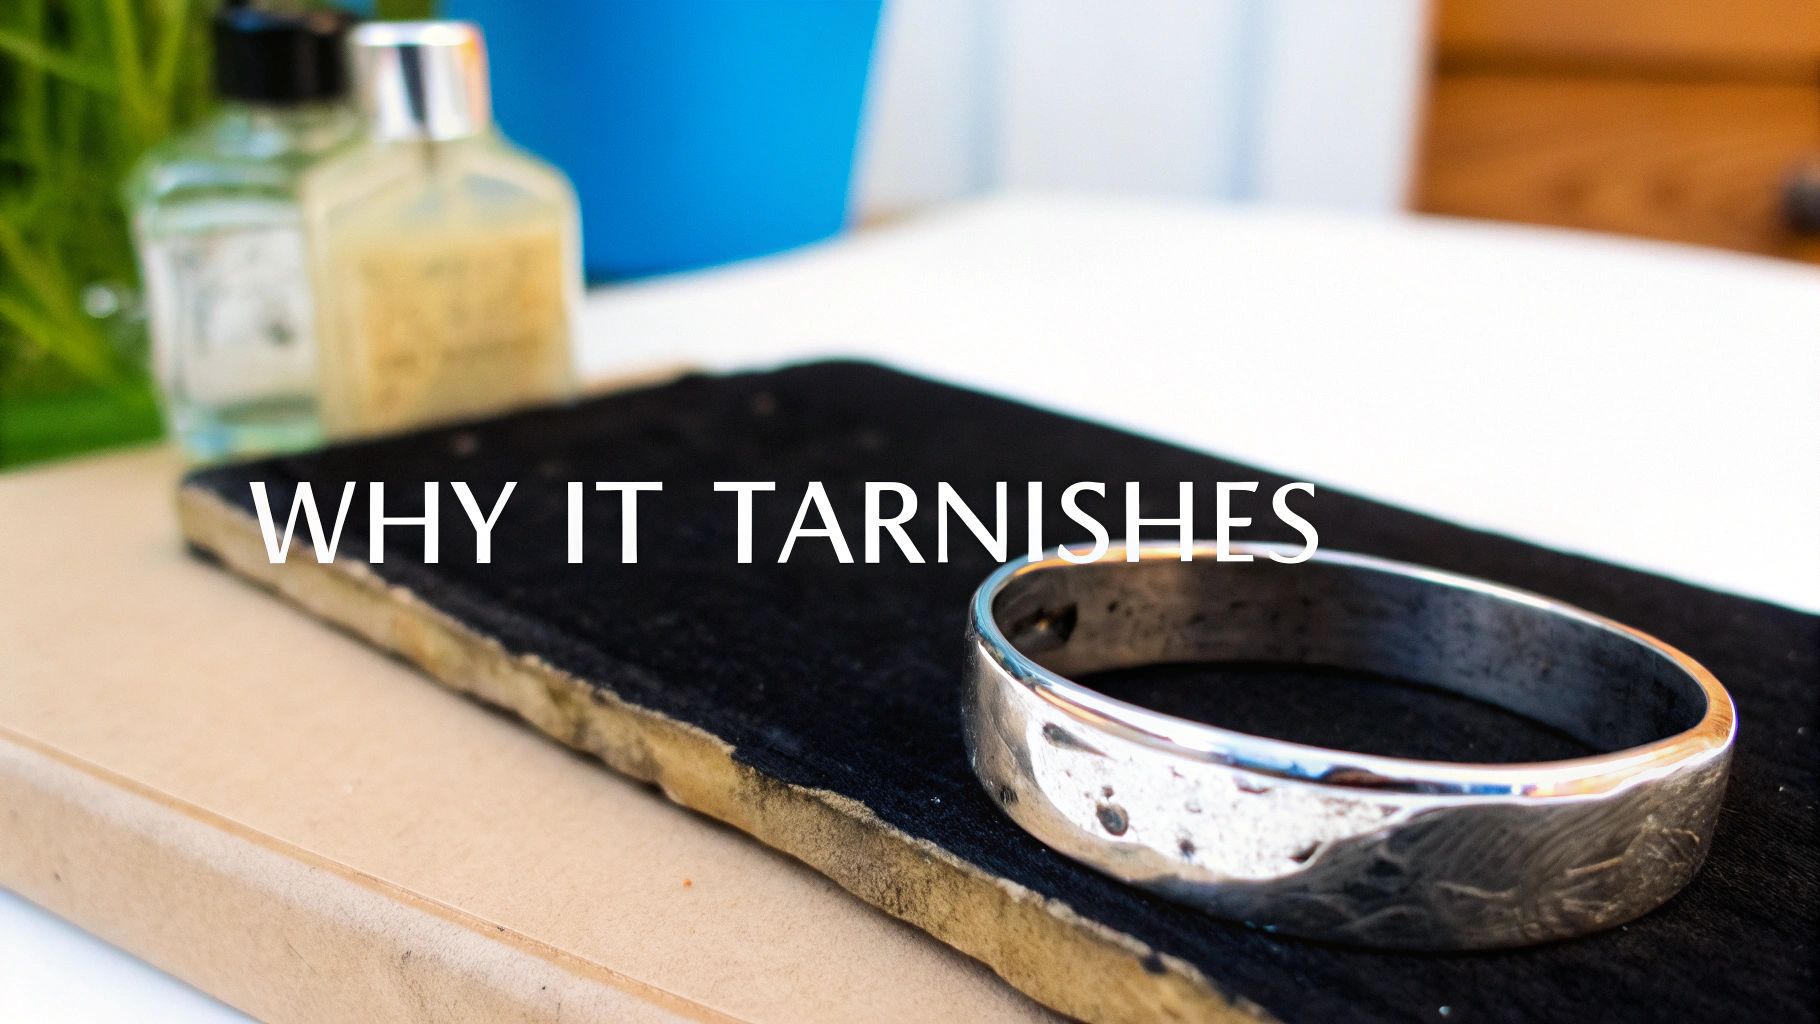
Before diving into how to remove tarnish from silver jewelry, it helps to know what you’re up against. That dark, dull layer on your favorite concho belt or silver cuff isn’t dirt or a sign of poor quality—it’s just a simple chemical reaction. Getting a handle on this process is the first step toward both cleaning and prevention.
At its core, tarnish is what happens when sterling silver meets sulfur compounds floating in the air. This reaction creates a thin layer of silver sulfide on the surface, which is the culprit behind that dark discoloration. Think of it less like a stain and more like a protective—though not very attractive—layer the metal forms.
Common Culprits in a Cowgirl's Environment
For those of us who love the Southwestern and estuarian cowgirl aesthetic, our environment often plays a huge role. Living near the coast or in a humid climate means the air is full of moisture and sometimes salt, both of which dramatically speed up tarnishing. It’s not your imagination; your jewelry really does tarnish faster in these conditions.
Beyond the air itself, everyday products are major contributors. You'll want to watch out for these common accelerators:
- Beauty Products: Things like lotions, perfumes, and hairsprays are loaded with chemicals that react with silver. A good rule of thumb is to always put your jewelry on last, well after your products have fully dried.
- Household Cleaners: Chemicals like chlorine and ammonia are extremely harsh on silver. They can cause immediate and severe discoloration, so always take your jewelry off before cleaning.
- Natural Body Chemistry: Believe it or not, your skin's unique pH and natural oils can also influence how quickly your pieces tarnish. This is why a ring might darken quickly on one person but stay bright and shiny on another. To learn more about this, our guide explains if sterling silver is hypoallergenic and how it interacts with different skin types.
Tarnish vs. Rust
It’s a common mix-up, but silver does not rust. Rust is a very specific type of corrosion that affects iron and steel, causing the metal to flake away and degrade. Tarnish, on the other hand, is a surface-level reaction that only affects the outermost layer of the silver.
Tarnish is purely cosmetic and doesn't damage the underlying metal. This is great news because it means that even heavily tarnished pieces can almost always be restored to their original brilliance without causing any harm.
This distinction is crucial. While rust signals structural decay, tarnish is simply a layer waiting to be polished away. Knowing this helps you approach the cleaning process with confidence, understanding that you are restoring the surface, not trying to repair damage.
Gentle Tarnish Removal with a Polishing Cloth
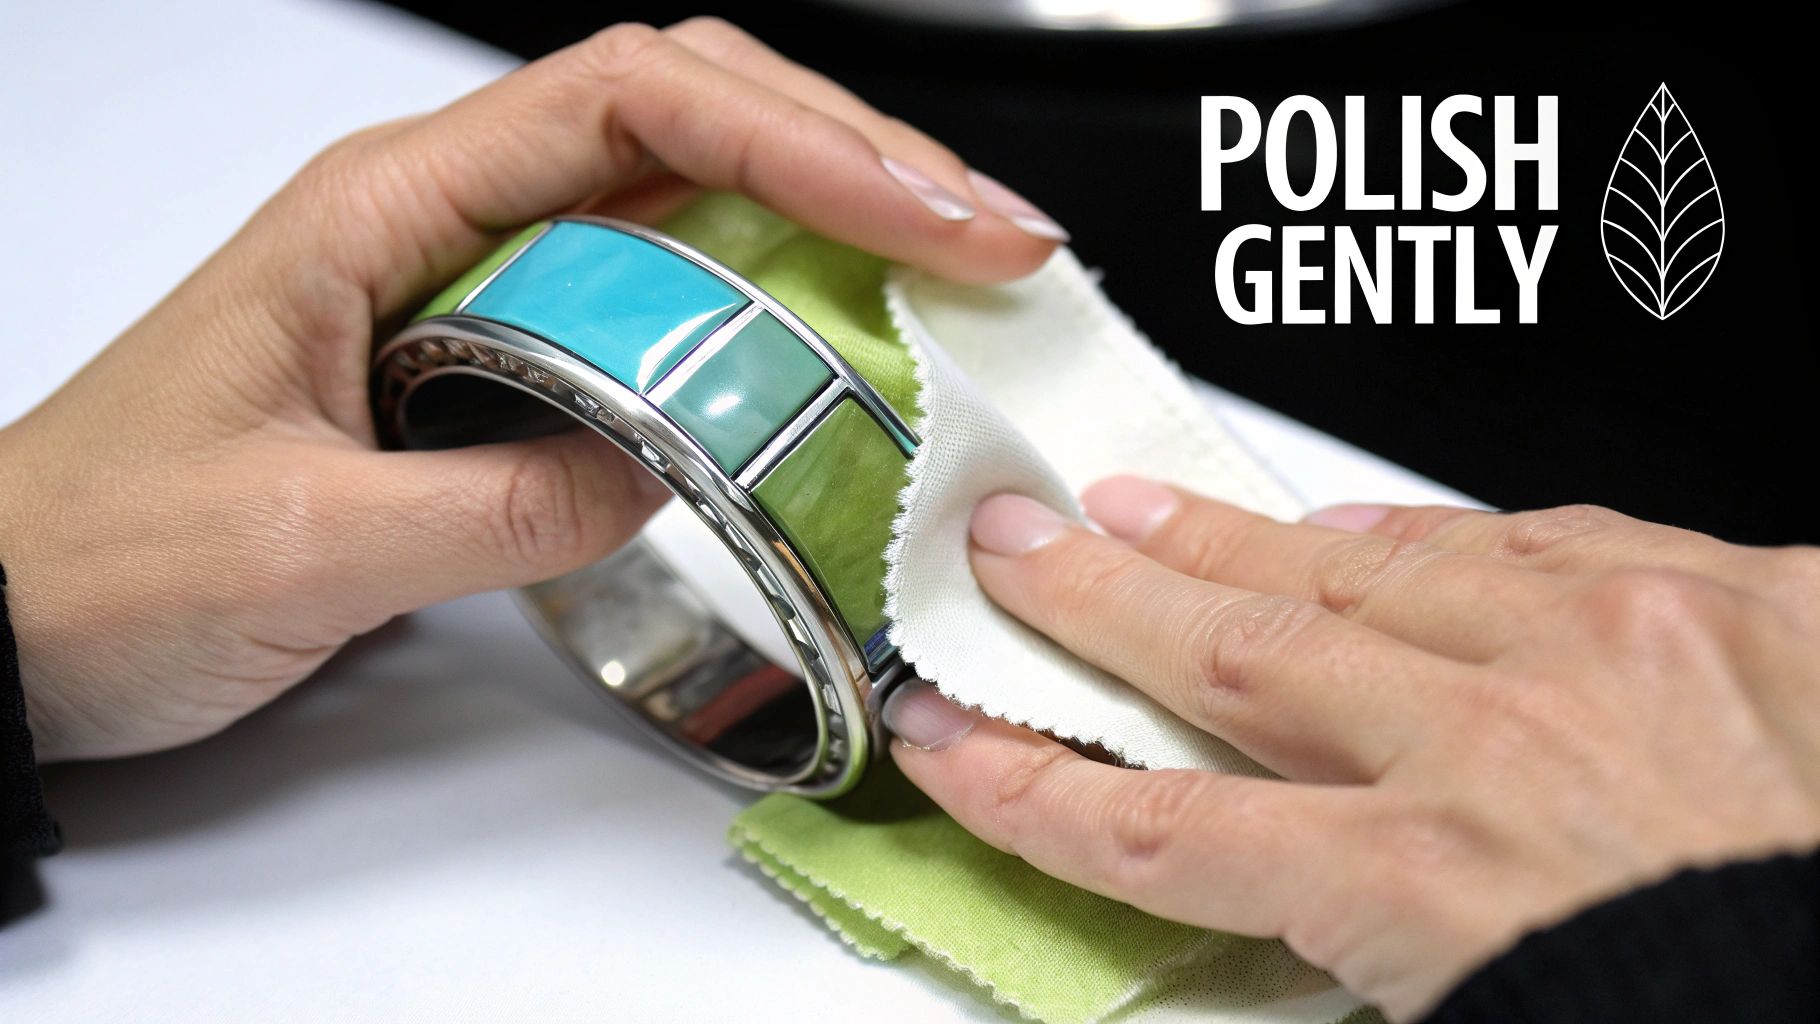
When you notice that first hint of dullness on your treasured Southwestern silver, a professional polishing cloth is your absolute best friend. This is especially true for pieces with delicate turquoise or coral inlays.
A good cloth offers the safest, most controlled way to lift away light tarnish. It's the first tool I always reach for, ensuring you don’t accidentally harm the very details that make your cowgirl jewelry so special.
This method is all about finesse, not force. The real technique for how to remove tarnish from silver jewelry with a cloth involves more than just aggressive scrubbing. You'll want to use your fingertip to back the cloth, applying gentle but firm and even pressure. Buff the silver in long, straight strokes—not small circles—to create that uniform, brilliant shine we're all after.
This controlled approach is crucial for preserving the artist’s original vision. It’s perfect for pieces with an "antiqued" or oxidized finish, where those dark, intentional details are meant to contrast with bright, polished silver.
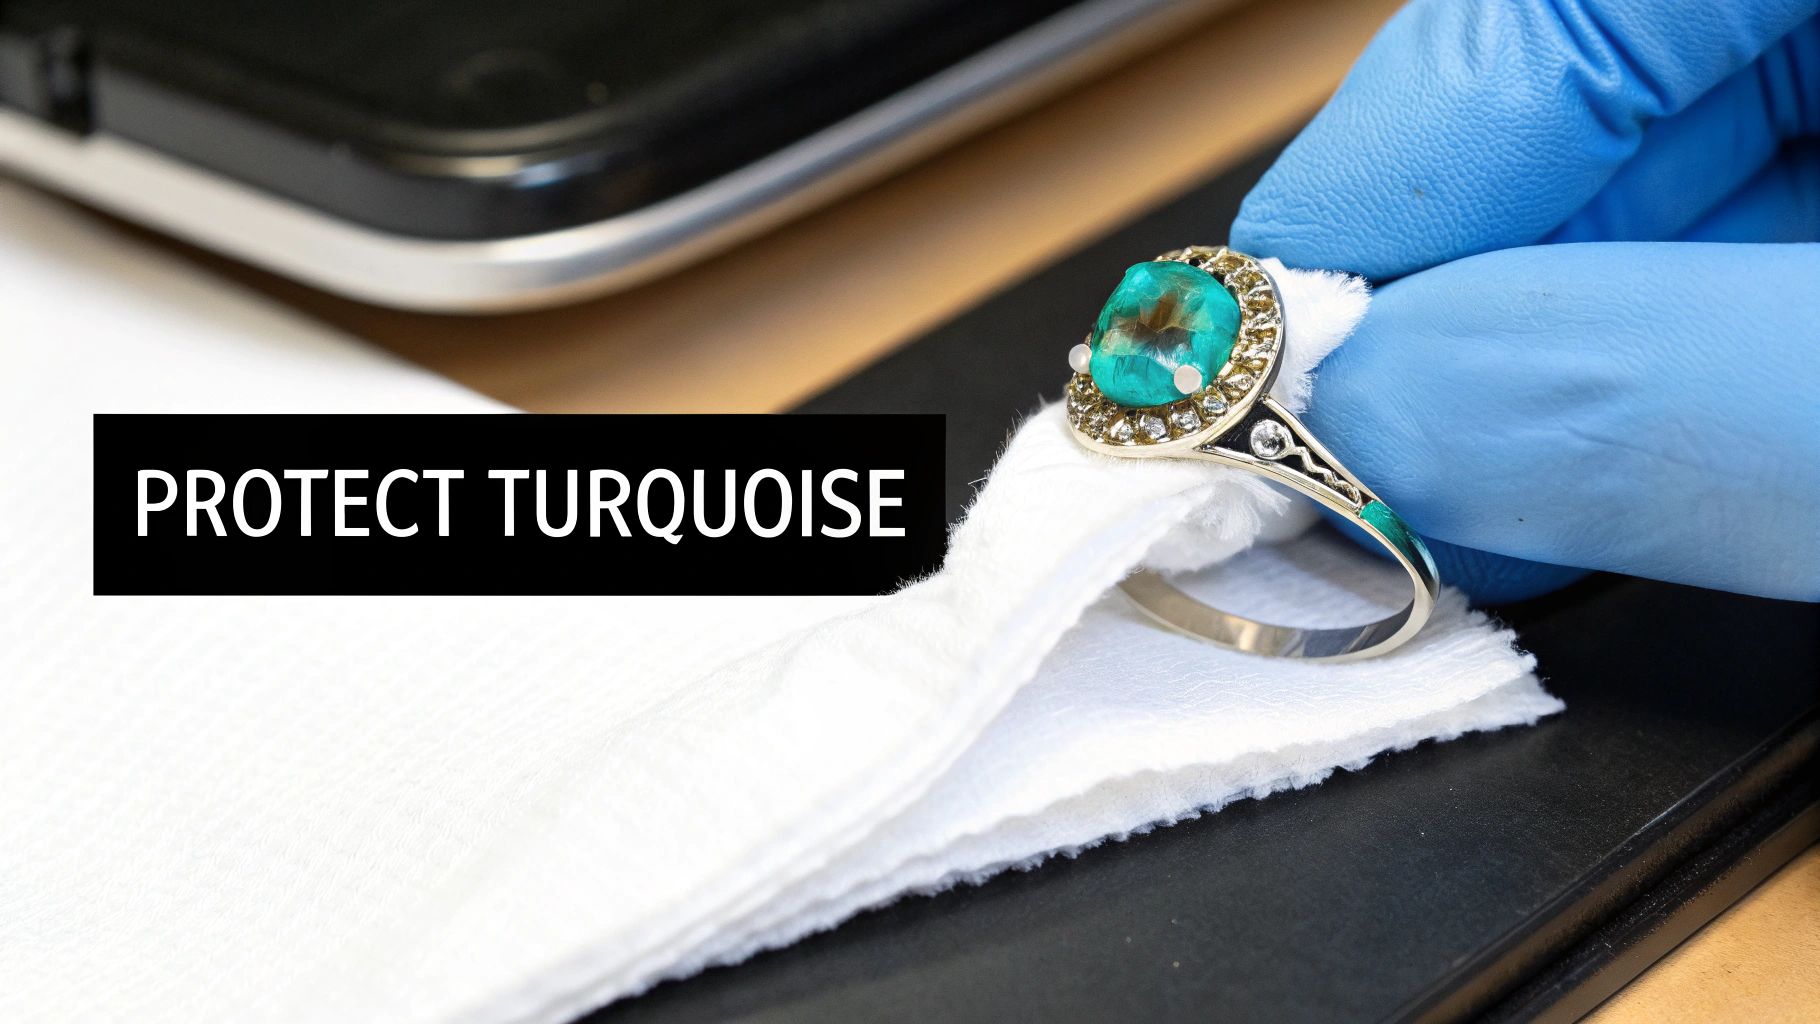
Polishing Around Stones and Intricate Details
Working with a piece that features gemstones is where the precision of a polishing cloth really shines. The goal here is simple: clean the silver bezel and band while completely avoiding the stone itself.
- Create a Precision Tool: Wrap a small section of the cloth tightly around your index finger or even a cotton swab. This gives you a much finer point to work with.
- Work Methodically: Carefully buff the silver right up to the edge of the stone setting. Make sure the cloth doesn't touch the gem, as the polishing compounds can be abrasive and may dull porous stones like turquoise.
- Tackle the Details: For intricate filigree or stamped designs, fold the cloth into a sharp crease. This lets you gently work it into the crevices, brightening the raised surfaces while leaving the deeper, oxidized areas beautifully dark.
This deliberate technique restores the shine exactly where you want it and nowhere else. If you're looking for more ways to keep your whole collection looking its best, check out our guide on essential jewelry care habits that keep pieces shining.
It's good to remember that even this gentle mechanical polishing physically removes a microscopic layer of silver. Conservation notes show that each session can remove less than a micron of metal. Over decades, this can lead to visible thinning, which is why a thoughtful, gentle approach is always best to preserve your heirlooms for a lifetime.
Your polishing cloth will eventually turn black as it lifts away the tarnish. That's a good sign—it means it's working! Never wash the cloth, as that will remove the polishing agents embedded in the fabric. Once it’s completely dark on both sides and no longer seems to be working, it’s time for a new one.
A Non-Abrasive Soak for Heavy Tarnish
Sometimes, a simple polishing cloth just won't cut it. For those solid silver pieces in your collection—maybe a heavy cuff bracelet or a favorite chain—that have developed a deep, stubborn layer of tarnish, you need a different approach. When your jewelry is uniformly dark and you need something more powerful, a non-abrasive chemical soak can work wonders without any harsh rubbing.
This method uses a simple electrochemical reaction to do the heavy lifting for you, safely converting that dark silver sulfide back into gleaming silver. It's a fantastic technique for restoring heavily oxidized pieces, but it comes with a critical warning: this is only for solid silver pieces without any stones or glued components.
The Science Behind the Soak
This process isn't magic; it's just really cool chemistry. Silver tarnish is mostly silver sulfide, which forms when silver reacts with sulfur compounds floating around in the air. When you create this bath, the aluminum foil acts as a more reactive metal. It essentially coaxes the sulfur to leave the silver and bond with the aluminum instead.
The baking soda and salt create an electrolyte solution, which is just a fancy way of saying it helps the chemical reaction happen much more efficiently. You can dig deeper into this fascinating process while exploring the best ways to clean silver. What you're really doing is chemically reversing the tarnishing process, not scrubbing away precious layers of your jewelry.
Preparing Your Tarnish-Removing Bath
Ready to give it a try? The process is surprisingly simple, but following the details is key to getting it right. You probably already have everything you need in your kitchen.
Materials You'll Need:
- A glass or ceramic bowl (never metal, as it will interfere with the reaction)
- Aluminum foil
- 1 tablespoon of baking soda
- 1 tablespoon of sea salt
- 1 cup of hot water (not boiling)
- A soft, clean cloth for drying
Start by lining your bowl completely with aluminum foil, making sure the shiny side is facing up. Sprinkle the baking soda and salt into the foil-lined bowl. Next, heat your water until it’s hot to the touch but not boiling—boiling water can be too aggressive and might even damage certain silver alloys.
Crucial Warning: Never, ever use this method on jewelry with turquoise, pearls, coral, or any other porous gemstone. The hot water and chemical reaction can cause permanent discoloration or even cracking. You should also avoid this soak for pieces with intentional oxidation or an "antiqued" finish, as it will strip away those beautiful dark details you love.
The Soaking and Finishing Process
Once your bath is ready, gently place your silver jewelry inside. You want to make sure each piece is making direct contact with the aluminum foil at the bottom. This physical contact is absolutely essential for the chemical reaction to work.
Now, carefully pour the hot water into the bowl, right over the jewelry and the powders.
You’ll probably notice a faint sulfur or "rotten egg" smell—don't worry, that’s a good sign! It means the sulfur is leaving your silver behind. Let the jewelry soak for 5 to 10 minutes, depending on how tarnished it is. You should be able to see the tarnish literally disappearing before your eyes.
After the time is up, carefully remove the jewelry using tongs (it will be hot!) and rinse it thoroughly under cool running water. This step is important for washing away any leftover salt solution. Finally, pat it completely dry with a soft, lint-free cloth. For an even more brilliant shine, give it a quick final buff with a polishing cloth. Our detailed guide offers even more advice on how to clean sterling silver jewelry at home using a variety of safe techniques.
Special Care for Turquoise and Mixed-Material Jewelry
If you collect Southwestern jewelry, this is the most critical part of this guide. Those vibrant turquoise, deep red coral, and iridescent mother-of-pearl stones are what give these pieces their soul, but they’re far more delicate than the sterling silver holding them. Harsh chemicals and abrasive soaks can cause permanent, heartbreaking damage.
Unlike a solid silver chain, these mixed-material treasures need a much more targeted, gentle approach. The whole game is about restoring the silver’s shine while keeping the stone completely protected. This takes a bit of patience and the right technique, but it's essential for avoiding costly mistakes.
Protecting Porous Gemstones During Cleaning
Turquoise is a porous stone, which means it can absorb liquids and chemicals just like a sponge. This single fact changes everything when you're figuring out how to remove tarnish from silver jewelry that features it. Any liquid cleaner that touches the stone can cause discoloration, turning a beautiful sky-blue gem into a dull, muddy green. It happens faster than you'd think.
To clean these pieces safely, you have to follow a few hard and fast rules:
- Never, ever submerge the piece. Forget the aluminum foil soak or any chemical dip. Submerging the jewelry guarantees the stone will be exposed to whatever is in that solution.
- A polishing cloth is your best friend. This is your primary tool because it allows you to apply pressure directly to the silver bezel and band without touching the gemstone.
- Work with precision. For tight spots, wrap a corner of the cloth around a cotton swab or just your fingertip. This gives you the control you need to meticulously polish the silver right up to the very edge of the stone.
This careful, targeted polishing is the only way to ensure your turquoise stays as vibrant as the day it was set. To get a deeper appreciation for these unique materials, you can explore our guide on Western jewelry styles from turquoise to stamped silver.
Preserving an Antiqued or Oxidized Finish
Many Southwestern pieces are designed with an “antiqued” finish. This is where the artist intentionally darkens the recessed areas of a stamped design to create depth and contrast. That patina is a crucial part of the piece’s character—it's not something you want to clean away. Aggressive cleaning will strip this finish right off, leaving the jewelry looking flat and erasing its authentic charm.
When you’re cleaning an antiqued piece, your only goal is to brighten the raised, high-polish surfaces. Use a polishing cloth to gently buff these areas, leaving the darkened crevasses completely untouched. Think of it as enhancing the highlights while preserving the shadows.
It's so important to use tools actually made for jewelry care. We've all heard the DIY "hacks" like using toothpaste or boiling water, but these methods are a huge risk. In fact, they're responsible for an estimated 15-20% of consumer complaints to jewelry repair services. When you understand how professionals approach tarnish removal, you see why gentle, specific methods are so vital. By respecting the materials and the artist’s vision, you preserve the story and soul of your jewelry for years to come.
Your Silver Jewelry Care Questions Answered
Even when you're careful, questions about keeping your silver jewelry looking its best are bound to pop up. From how to stop tarnish before it starts to figuring out when a piece is past a DIY fix, getting the right answers is key. Let's tackle the most common concerns I hear, especially from collectors of Southwestern and estuarian cowgirl jewelry, so you can preserve your cherished collection.
How Can I Prevent My Silver Jewelry From Tarnishing So Quickly?
Honestly, prevention is your best friend here. The absolute most effective way to slow down tarnish is to limit how much your jewelry is exposed to air and humidity—those are the main culprits.
After you take off your jewelry for the day, give each piece a quick, gentle wipe with a soft, dry cloth. This little habit removes the natural oils from your skin, sweat, and any residue from lotions that can speed up the tarnishing process. This is a game-changer if you live in a humid or estuarian coastal area where the air itself is working against you.
Proper storage also makes a huge difference. Here’s how to get it right:
- Airtight is Ideal: Tuck each piece into its own small, sealed plastic bag to keep the air out.
- Use Anti-Tarnish Strips: Pop one of these little strips into your jewelry box. They work by absorbing the airborne sulfur that causes tarnish.
- Jewelry On Last: Make it a rule to put your jewelry on after you’ve applied lotions, hairspray, and perfume. Letting those products dry first minimizes direct chemical contact with your silver.
- Avoid Water: Never, ever wear your silver jewelry in showers, pools, or hot tubs. Both the moisture and chemicals like chlorine will cause it to discolor shockingly fast.
Is It Safe To Use Toothpaste To Clean My Silver Jewelry?
Please don't do this. This is one of the most stubborn and damaging myths about jewelry care I've come across. It might sound like a clever life hack, but using toothpaste is a guaranteed way to cause irreversible harm to your beautiful silver pieces.
Think about it: toothpaste is designed to be abrasive. That’s how it scrubs your teeth clean. When you rub it on silver, those same abrasive particles create thousands of tiny scratches all over the surface. It might look like it’s removing tarnish at first, but what's really happening is you're dulling the finish and physically scraping away a fine layer of precious metal.
Over time, this scratching will completely ruin the beautiful, smooth patina and brilliant shine of your handcrafted Southwestern jewelry. Stick to products specifically made for the job, like a high-quality, soft polishing cloth, to protect your investment.
How Do I Clean Pieces With Intentional Dark Areas?
This is a fantastic question because it gets right to the heart of what makes Southwestern jewelry so special. Those dark areas you see in the crevices of a stamped design are called intentional oxidization, or an "antiqued" finish. They're a deliberate part of the artist's design, added to create depth, contrast, and character.
You have to be extremely careful not to remove this finish. Never use chemical dips or the aluminum foil and baking soda method on these pieces. Those techniques are like a chemical bulldozer—they can't tell the difference between good and bad tarnish and will strip away the oxidation, leaving the design looking flat and lifeless.
The only tool for this job is a professional silver polishing cloth. The trick is to use your fingertip through the cloth to gently and deliberately buff only the raised, shiny surfaces you want to brighten. Take your time, be patient, and carefully avoid the recessed, darkened areas. This will preserve the artist's original vision and the authentic soul of the piece.
When Should I Take My Jewelry To A Professional?
Knowing when to step back and let an expert take over is one of the smartest things you can do to protect your valuable jewelry. It’s time to visit a professional jeweler in a few specific situations.
If a piece has extremely heavy, black tarnish that doesn’t budge with gentle at-home methods, a professional has stronger, specialized tools to restore it safely. You should also hand over valuable antique pieces or family heirlooms, as they might require specific conservation techniques that you just can't replicate at home.
Finally, if a piece has very delicate, intricate settings or features fragile, porous stones like turquoise or opal, a professional cleaning is the safest bet. They can clean the silver without harming the stones and, just as importantly, they'll inspect the prongs and settings for any wear and tear. This ensures your treasured jewelry remains secure and in perfect condition for years to come.
At Silver Elegant, we believe that every piece of jewelry tells a story, and proper care ensures that story can be passed down for generations. Explore our collection of handcrafted Southwestern and boho-chic designs to find your next treasure. Visit us at https://silverelegant.com.